Monday, April 29, 2013


Wednesday, April 24, 2013


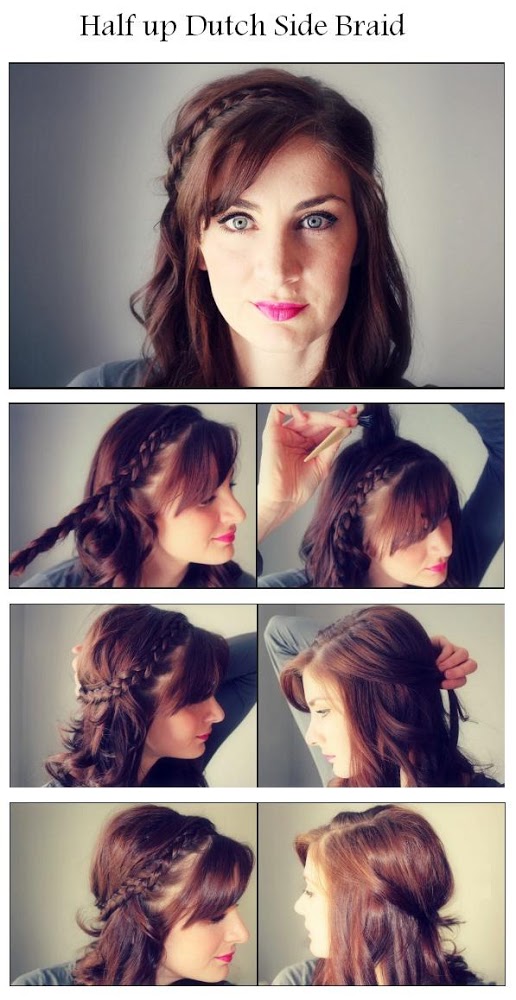
Wednesday, April 17, 2013


Tuesday, April 16, 2013

.jpg)

Monday, April 15, 2013
Ponytail twist: Hair Tutorial
 |
Step:3. Take the larger section and make a ponytail, securing tightly with a rubber band.
Step:4. Twist the smaller section AWAY from your face. Make the twist as tight as you can, so it doesn't become too loose later on.
Step:5. Wrap the twisted section over the top of the ponytail and around to the bottom.
Step:6. Pin the twisted wrap in place. I like to use lots of U-shaped hair pins to make it really secure.
Braided Crown: Hair Tutorial
 |
Step:1. First, part your hair into two sections. To make the look softer, I like to make a diagonal part in the front (starting sort of near the arch of my left eyebrow, going towards the middle of the crown) and then bring the part straight down the back.
Step:2. Braid the two ponytails, and secure each with a small rubber band.
Step:3. Make sure the tops of the braids are pretty loose (you don't want that part pulled too tight or you'll be able to see the part line going down the back).
Step:4. Take the braid on the right and wrap it around the front. Wrap it low and loose near your front hairline (versus on the top of your head).
Step:5. Pin the braid in place with bobby pins. I like to use mini ones, but if you have thick or unruly hair, bigger pins will work better.
Step:6. Take the second braid and wrap it around the back. Again, I like to keep it low and loose so it sort of flows into the front braid.
Extended Lengths: Hair Tutorial
 |
Step 1: Start out with dry straight hair and have your extensions ready. *Note brand new hair is extremely silly and smooth. So unless you hair is the same texture, I would HIGHLY recommend washing them first. I use Redken shampoo and conditioner. This makes them a bit more natural feeling and easier to style.
Also, I use 2 packs of hair.
Step 2: Put your hair up on the top of your head, and pull down about a 1 in section of hair. Spray hair at the part with hairspray.
Step 3: Tease section of hair with a rat tail comb. This will help the extension clip have something to grasp onto.
Step 4: Grab one of your extension wefts. I normally start with a smaller one.
Step 5: Hold weft up to the part, and center it. Then starting with the middle snap, clip extension into place.
Step 6: Continue these steps until you reach the top half of your head. *see photo. This is the order I place extensions, from the bottom up. Small, small, long, long, small. (All with 3 clips)
Step 7: Part hair on the side, and clip in the very small wefts. The ones that only have 1 clip. Repeat on other
Saturday, April 13, 2013

Subscribe to:
Posts (Atom)